APEX 21.2 quickie: syntax highlighting with prism.js

To show (not to edit) pretty code inside an APEX application in the past I had used the libraries that were deployed along with APEX, like CodeMirror (see https://svenweller.wordpress.com/2015/12/07/apex-5-syntax-highlighting/) and CkEditor. In APEX 21 CkEditor got a new version and CodeMirror is not supplied anymore since several APEX versions now. But there is a new very lightweight alternative, which is prism.

In my use case I need this to quickly present currently running edition based plsql code.

Implementation

Step 1) Load code into a hidden page item

I use a before region process to load the data (=code) into an item. Assuming item name P1_CODE for further references.

Step 2) Add prism files to the page

Javascript file urls

#PRISMJS_DIRECTORY#prism.js

CSS file urls

#PRISMJS_DIRECTORY#prism.css

Note that the substitution variable PRISMJS_DIRECTORY is automatically provided and resolved to the path “/i/libraries/prismjs/1.24.1/” and is updated in future versions.

Step 3) Show item in html region and choose the language

Add this to the html code section of a static region.

Note that you should set the correct language that you want to show. In my case it is language-plsql.

<pre><code class="language-plsql">&P1_CODE.</code></pre>

The value in the item is automatically html escaped. In case the logic that loads the code into the item did already escape it, you can also choose not to escape it again, by using an escape filter like &P1_CODE!RAW. . Just be aware of potential security issues, if you do not do that correctly.

A list of possible languages can be found here. However not all of those languages are added in the APEX deployment.

Step 4) Customize a few colors

I didn’t like the coloring for plsql or sql code. Especially I prefer to show comments in green. This can be changed with a few lines of css.

Add this to the inline css section of the page

/* prism plsql colorization */
.token.comment {
  color: #119b01;
}
.token.string {
  color: #0c6cb97c;
}
.token.keyword {
  color: #8C009B;
  font-weight: bold;
}

Very quick and easy to implement.

If you want different settings, simply inspect the code snippet using the browser. That is one of the advantages of prism. The code is tokenized using span tags and the appropriate classes. We can easily see what kind of token a certain element is and simply change the style for the class we want.

Result

Here is a crude overview how the result looks like

Additional considerations

prism has the possibility to add many additional features. However those features come as plugins that are packed directly into the .css and .js files. To use them, one would have to add/replace the library that is used by APEX. I didn’t investigate in detail, which plugins are already inclued. For example line numbering does NOT seem to work out of the box.

This would do the trick with the line numbers, if the line-numbers plugin is integrated.

<pre class="line-numbers" data-start="50"><code class="language-plsql">&P1_CODE.</code></pre>

Conclusion

For simple requirements prism allows a very easy and quick way to add syntax highlighting to code. For more complex requirements (like editing code) a different library might be better suited. The possibility to have dedicated subtitution strings for several libraries is very welcome.

One additional note. I tried to use the markdown editor item type as an alternative, but the effort to make it work for my simple requirements, was too high. A markdown editor simply serves a different purpose.

How to setup APEX Developer Accounts on Oracle Cloud Infrastructure (free tier) – a suggestion

If you are an APEX Developer who just wants to move to the cloud, there are some things that you should be aware of. Here is my proposal what steps should be done to “cloud enable” APEX developer accounts. This post is only about setting up an account, not about any nifty features to use.

Scenario: We are an admin who already created a new APEX workspace and now wants to give some developers access to that workspace.

The actions were confirmed on Oracle Free Tier cloud featuring a 19c database and APEX 20.2. There is a good chance that some of the obstacles are removed in a newer version. At time of writing it is possible to setup an 21c database on the oracle free tier cloud.

Admin actions

1. create APEX developer account

Inside the workspace create a new APEX account.

Administration/Manage Users and Groups/Create User

Set it to developer. Set and remember the password. You will notice, when switching developer on, the button to “Require Change of Password on First Use” will deactivate.

APEX developer and admin accounts in the cloud are created as database users (in uppercase). This has several major implications.

  • The developer can NOT login into the workspace and change the password. For admins it is possible to set a new password using the admin page. Trying to change the password using the normal way of “change my password” results in a success message, but the change is silently ignored. I assume this is the reason, why the "Require Change of Password on First Use" button is deactivated.
  • The password rules of the database apply. On Autonomous Transaction Database (ATP) the accounts use the default profile, which uses the CLOUD_VERIFY_FUNCTION
https://docs.oracle.com/en/cloud/paas/autonomous-database/adbsa/manage-user-profiles.html#GUID-BD3C5573-DF0E-4E44-919A-08A471462B87
  • Using the same developer name over different workspaces means the same password is used for all. I think this is a welcomed feature, but it certainly is a change to what one is used on other platforms like on premises or on apex.oracle.com.
  • If the developer username has special characters in it, for example a dot or an @ as in “firstname.lastname@my.email”, then the database user later always needs to be put in double parenthesis “firstname.lastname@my.email”. Although that works, it prevents certain other options, like rest enabling the account (ORA-20018: Schema or user name must be a simple unquoted literal).

    I strongly recommend to only use letters, numbers and underscores for the name (simple literals). No dots, no @, no blanks or any other special chars. For specific rules see the docs:

Nonquoted identifiers must begin with an alphabetic character from your database character set. …
Nonquoted identifiers can only contain alphanumeric characters from your database character set and the underscore (_), dollar sign ($), and pound sign (#). … Oracle strongly discourages you from using $ and # in nonquoted identifiers.

From https://docs.oracle.com/en/database/oracle/oracle-database/19/sqlrf/Database-Object-Names-and-Qualifiers.html#GUID-75337742-67FD-4EC0-985F-741C93D918DA
  • The option to create multi users via one dialog does not work properly for developer accounts. Do not use this dialog! (It is possible to use it for end users.)

Side note: End users are not created as a database users. This means we can change the end user password using the normal APEX logic. And the other implications do not apply for them as well.

2. enable the developer to connect with SQL Developer

enable connect

Per default the created db user can not create a session. We need to give him that, so he/she can connect and change the password.

grant create session to <developer>;

proxy connect

A developer usually needs full access to the application schema (with the tables in it) he/she is working with. To avoid distributing the application schema password one can setup a proxy connection. This means the developer authenticates him/herself using the individual password, not the password of the application schema.

alter user <application_schema> grant connect through <developer>;

There are additional options possible like setting an extra password for the proxy connect or allowing only specific roles. For the typical developer scenario those extra settings seem not necessary.

Side note: A proxy connection is what APEX also uses to connect to the schema using only the APEX_PUBLIC_USER.

send wallet

To access the cloud database from a local client a key is needed. Oracle provides this key in a PKCS#12 wallet inside a wallet.zip file. The admin can download this wallet from the database service console. This is a database instance wallet that is only valid for this specific database. There are also regional wallets that are valid for all databases inside a region.

Write down who you sent the zip to. This is important since the admin might want to rotate the wallet. I prefer long intervals for the wallet rotation. But it should be rotated from time to time (for more information see: Rotate Wallets for Autonomous Database ).

Make the developer understand that he/she is not allowed to give the wallet to other users/developers.

Side note: There is an api to handle wallets (https://docs.oracle.com/en-us/iaas/api/#/en/database/20160918/AutonomousDatabaseWallet/UpdateAutonomousDatabaseWallet). Using this api one could automatically rotate the wallet at defined intervals.

Developer actions

3. wallet handling

Store the wallet_INSTANCENAME.zip into some local folder.

In general there is no need to unzip the wallet file. A noticeable exception would be if you want to use edition based redefinition. I wrote about this before:

4. setup SQL developer

Two connections are recommended.

One for the developer account itself. This one is needed to easily change the password. Additionally most developers like to have an environment were they can try out stuff. Further privs might be needed for that (create view, etc.).

And one connection for the application schema using a proxy connect.

To connect to the cloud from a local (and recent) SQL Developer installation is simple. Choose “Cloud Wallet” as the connection type and point the developer to the wallet zip file, choose the tns alias (service) and your done. On the free tier you should choose the “xxx_low” alias.

To create a proxy connect the name of the target schema (in my example DEMODB) needs to be configured under the tab “Proxy User”.

I also suggest to add this schema to the name of the connection. I use [schemaname] for that, because that is the syntax for proxy connects in SQL Plus.

SQL> connect "SVEN.WELLER"[DEMODB]/mysecretPwd1111

5. change the password

There are multiple ways to reset a password using SQL Developer. The good thing is, they also work for cloud connects (a recent jdbc driver is needed for way a) ).

a) Right-click on the connection and choose “Reset Password” . This also works for proxy connects and does reset the password for the individual user.

b) Type password in a connected worksheet

This changes the password for the schema. For a normal connection without a proxy this changes the password of the connected user.

In case of a proxy connect it tries to change the password for the PROXY client.

Since the developer will not have this password, he/she will not be able to change it.

c) And it is possible to change the password using the ALTER USER command. Everybody can do this for their own password even without enhanced privileges.

If the username has special chars in it – like in my case the dot – then do not forget to use ” around the name. Regardless of the special chars, the name will be in UPPERCASE. And of cause the password rules apply.

In addition to that alter user command, in the cloud environment, the original password needs to be mentioned too. otherwise the above command will result in the following error message

ORA-28221: REPLACE not specified
*Cause: User is changing password but password verification function is turned on and the original password is not specified and the user does not have the alter user system privilege.
*Action: Supply the original password.

Solution is easy, just add the old password to the alter user command. The complete syntax is

alter user <developerschema> 
     identified by <new password> 
     replace <old password>;

Conclusion

In the cloud each APEX developer is a database user. Treat it like one.

Jeff Smith shows a brand new option to manage DB users using SQL Developer web: https://www.thatjeffsmith.com/archive/2021/03/creating-users-granting-storage-quota-using-database-actions/

APEX 19.2 quick tip: error messages for PL/SQL Dynamic Content regions

Sometimes I use a region of type PL/SQL Dynamic Content. It is rare and there are often better alternatives – like using a select over a pipelined table function – but it still happens.

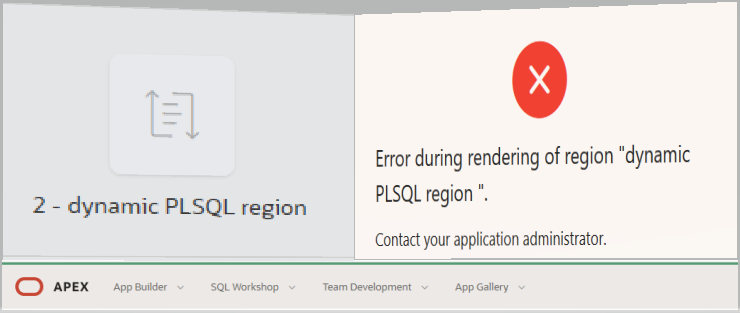
If the plsql code errors out, then the error is not shown on the same page, but instead is presented as a page rendering error.

Here is a simplified example:

The PL/SQL Dynamic Content region looks like this

   sys.htp.p('Hello APEX world!');
   raise_application_error(-20201, 'Virus detected, world stopped!');

Running the page results in an ugly rendering error on a separate error page. See right display.

Remember the “Technical Info” part is not shown to the end user. So the error message is not shown.

Here is what I did to improve the error presentation. There might be better ways to do it, but it was a quick win and worked for me. So it might help you as well.

1. Capture the error message and write it to the page.
Here I used a hidden div. The class “sqlerror” is used to mark the div.

begin
  sys.htp.p('Hello APEX world!');
  raise_application_error(-20201, 'Virus detected, world stopped!');
exception
  when others then
    -- currently this does not show the error at the page. This would work in a page process.
    apex_error.add_error (
      p_message          => sqlerrm,
      p_display_location => apex_error.c_inline_in_notification 
    );     
    
    --write error into hidden page item
    sys.htp.p('<div class="sqlerror" style="display:none">'||sqlerrm||'</div>');
end;  

2. After page load, use a dynamic action to find this error and display it.

We can not use the “After Refresh” event since PLSQL Dynamic Content regions are not refreshable. So it must be “Page Load”.

// test if there was an error during rendering of any region on the page
if ($('.sqlerror').length) {

    //First clear the errors
    apex.message.clearErrors();

    // Now show new error
    apex.message.showErrors([
        {
            type:       "error",
            location:   [ "page" ],
            message:    $('.sqlerror').text(),
            unsafe:     false
        }]);    
}

Result:

A major difference is that everything that was already rendered at the time of error is now shown in the region. This might be wanted or could be unwanted.

Also we essentially hide the error from the apex engine. So when inspecting /utilities/Debug Messages/ we don’t see that error anymore.

Before the change we would get a debug entry like this

Since we suppressed all errors, we need to call apex_debug.error inside the plsql exception handler.

    
    -- APEX debug  instrumentation call
    apex_debug.error ('Rendering of region failed! %s', sqlerrm);

And then we get such an entry in the APEX debug stack.

tested in APEX 19.2 and 20.1. It should also work in older versions, although the javascript api apex.message.showErrors might need to be replaced with some custom logic.

conclusion

The region type “PL/SQL Dynamic Content” is very different to normal APEX regions. Do not forget to implement and test some basic error handling if you must use such a region type.

Side node: In theory you should also watch out for an XSS attack. If somebody manages to add malicious code into the error message, it might be shown on the page. I didn’t test for that however.

APEX 19.2 upgrade quick tip: run check_lovs_for_errors.sql

The APEX 19.2 readme includes info about a small script check_lovs_for_errors.sql that one should run after the upgrade. It is very easy to overlook this in the readme files.

TL;DR;

run

sqlplus user/pwd@dbconnection
spool apex/utilities/check_lovs_for_errors_results.log
set serveroutput on
@apex/utilities/check_lovs_for_errors.sql APP_ID APP_USER
spool off
exit;

Read the result and correct the suspect LOVs in your application.

Behavioural change

Essentially there was a small change in the behaviour of existing LOVs. If the select that supports the LOV uses the identical name for the display and the return value, then this used to work, but will not anymore in 19.2.

And not work, means we will get an error when running that page.

Here is the relevant section of the release note.

Not only selects that use the same name for display and return value are effected, but also selects that run into an error. LOVs with the first kind of select did work before, LOVs with an error select did not work before. Now such an error might prevent the page from opening. Usually you should not have LOVs of the second type.

Fortunately the APEX team provided the little script check_lovs_for_errors.sql that help us to identify such LOVs.

How to run the script

The script is in the APEX installation folder (where you unzipped the APEX file) in the path apex/utilities/. In case you don’t have access to the script I show it at the end of this blog post. It might help you to identify such LOVs in your own application.

In my environment (18.7 database) the script would not run properly as SYS or as DBA. The reason for this is described in section “how to not run the script”. Instead one needs to connect with the schema of your workspace account. I didn’t test it, but I think you might be able to run it in the SQL workshop.

The script uses two input parameters.

1 = APP_ID = application id
2 = APP_USER = name of an apex user who has access to the application

You won’t need the password for the APP_USER.

Only LOVs from this application will be checked. And the name of the user is used to create an apex_session context.

You can add those parameters while calling the script or later in interactive mode, when the script is running .

Before running the script one must enable serveroutput to see the results.

I suggest to spool the output into a file

[oracle@ODA01 utilities]$ sqlplus /nolog
SQL*Plus: Release 18.0.0.0.0 - Production on Fri Feb 7 09:28:49 2020
Version 18.7.0.0.0

Copyright (c) 1982, 2018, Oracle.  All rights reserved.

SQL> connect workspaceschema/pwd@dbconnect
Connected.
SQL> spool check_lovs_for_errors_result.log
SQL> set serveroutput on
SQL> @check_lovs_for_errors.sql
Enter value for 1: 200
Enter value for 2: weller
--------------------
Error #1
Application: 200
Type:        Inline
Page:        3110
Name:        P3110_SELECT_LIST_ITEM
...
...
--------------------
Action Required! 5 LOV definitions raised an error, please review to see if they need to be fixed to avoid facing the same error in your app at runtime.

PL/SQL procedure successfully completed.

spool off

The output prints the errors that are found to the screen via dbms_output. Thats why spooling it to a file helps. You can always rerun the script to see the same or the corrected results.

Don’t forget to switch spooling off after the script run.

How to not run the script

If you connect with an account (db schema) that is doesn’t have the right to read your apex workspace data, then this error message appears.

ORA-20987: APEX – Security Group ID (your workspace identity) is invalid. –
Contact your application administrator.

If you connect as sys or with a dba account another error will probably happen.

SQL> connect / as sysdba
Connected.
SQL> alter session set container=pdb01;
Session altered.

SQL> @check_lovs_for_errors.sql
Enter value for 1: 200
Enter value for 2: weller
declare
*
ERROR at line 1:


ORA-06598: insufficient INHERIT PRIVILEGES privilege
ORA-06512: at “APEX_190200.WWV_FLOW_EXEC_API”, line 1
ORA-06512: at line 71
ORA-06598: insufficient INHERIT PRIVILEGES privilege
ORA-06512: at “APEX_190200.WWV_FLOW_SESSION_API”, line 56
ORA-06512: at line 11

This error will only happen in Oracle DB 12.1 onwards. A new plsql security feature was introduced. SYS and DBA accounts do not have the inherit (any) privileges privilege that they need to execute something using invoker rights.

If you connect with your normal database schema, the script will run.

The problem for SYS connects can be circumented by granting and afterwards revoking the INHERIT PRIVILEGES. I didn’t test this.

grant inherit privileges on user MYSCHEMA to sys;

It could also be that user needs to be the APEX schema APEX_190200.
To restore the original situation, revoke the grant.

revoke inherit privileges on user MYSCHEMA from sys;

Interpret and handle results

The script tries to run all selects that are powering the LOVs inside some apex session context. If an error is encountered, the statement and the error is reported.

A typical final result looks like this:

...
--------------------
Action Required! 5 LOV definitions raised an error, please review to see if they need to be fixed to avoid facing the same error in your app at runtime.

PL/SQL procedure successfully completed.

The typical problematic SQL that this script reports is when the two columns (display value and return value) have the same name.

The best way to correct this is (after the upgrade) to convert the LOV into a shared component that uses the new LOV logic. The new LOVs can have more the 2 columns and can declare, which column is used for the DISPLAY and which for the RETURN value and even one for icons. Display and return value could even be the same single column from the select.

Many but not all changes are so easy.

There are a few additional quirks I would like to mention.

Quirk 1 – false positives

A false positive is when the script reports an error, but in reality the query will never error out. This can happen for example if the select uses page items that are set when the LOV is used, but not set, when the script tests this query. Maybe because during the test all page items are empty.

Here is an example of such a case.

select first_name||' '||last_name as display_value, 
       employee_id as return_value
from hr.employees
where hire_date >= to_date(to_char(:P1_YEAR + 1) || '-01-10' ,'YYYY-MM-DD')

Error: ORA-01841: (full) year must be between -4713 and +9999, and not be
0

The problem in this example is, that the page item P1_YEAR is NULL while testing the query. Using NULL here leads to the ORA-error message. In reality this page item is filled with some value by other means (default, page load process, cascading parent lov, url parameter, …)

There could be many false positives. In my case 2 out of 5 findings were false positives.

If it is easily possible, then I suggest to rewrite such statements into a form that will not break the SELECT when the input items are null. This is not needed, but makes the code more robust, and also avoids that this statement is reported as problematic the next time this script runs.

For the example the solution could be to use an item that delivers the full date string

select first_name||' '||last_name as display_value, 
       employee_id as return_value
from hr.employees
where hire_date >= to_date(:P1_THREASHOLD_DAY ,'YYYY-MM-DD')

Quirk 2 – the output from the script has broken lines

When you take the reported SQL from the log file, then this SQL might not run, because of wrongly reported line breaks.

Example case (SQL statement was slightly modified and shortened)

original statement

Please notice, that there are several one line comments

select d,r
from (
   select anzeige_name||'('||dty_daten_typ||')' d
        , spalte_name r
        , spalte_anzeige_name rank
   from targettable
   --where (:P30_TYP,'J') in
   where :P30_TYP != 'I'
   and (:P30_ART,'J') in
      (('R', ck_bedingung1)
      ,('B', ck_bedingung2)
      ,('Z', druck_relevant2)
   --    ,('T', befehl_bedingung1)
   --    ,('I', befehl_relevant)
       )
--order by tabelle_name, anzeige_name

Broken spool output from script

select d,r
from (
   select anzeige_name||'('||dty_daten_typ||')' d
        , spalte_name r
        , spalte_anzeige_name rank
   from targettable
--where (:P30_TYP,'J') in
where :P30_TYP != 'I'
   and (:P30_ART,'J') in
      (('R', ck_bedingung1)
      ,('B', 
ck_bedingung2)
      ,('Z', druck_relevant2)
   --    ,('T', befehl_bedingung1)
   --    ,('I',
befehl_relevant)
       )
--order by tabelle_name,
anzeige_name

Please notice that there are line breaks now that are not in the original select. Some lines are broken in weird places – like inside comments.

The LOV and the statement that is executed by the script does not have this issue.

This is an example SQL that had a not existing column name somewhere. However I first needed to correct the wrong linebreaks, before I could successfully reproduce the issue inside SQL developer.

The error that is shown by the script itself is correct.

Quirk 3 – errors on outdated pages

Sometimes we have pages in our application that are not in use anymore. There is a higher chance for LOVs/Selects erroring on such a page. The error reported is correct, but the application would never run into this error.

Time to clean up and throw out the old stuff! This is sometimes a tough decision to make. We are only upgrading the APEX version, we should keep changes to our code to a minimum. It certainly helps, when all pages are under version control. Then one can always reconstruct the deleted page from VCS.

Additionally one should keep a backup copy of the old images folder. I usually just rename it to /i_old/.

Main query used

This query is used to identify the LOVs. Each LOV is then executed in a dynamic APEX session context

select *
from ( select 'Inline' lov_type,
              application_id app_id,
              page_id page_id,
              item_name name,
              lov_definition query
       from apex_application_page_items
       where lov_definition is not null
       and lov_definition not like 'STATIC%'
       and lov_definition not like '.%'
       union all
       select 'Shared Component' lov_type,
               application_id app_id,
               null page_id,
               list_of_values_name name,
               list_of_values_query query
               from apex_application_lovs
               where source_type_code = 'LEGACY_SQL' 
        )
where app_id = &APP_ID
order by lov_type, app_id, page_id, name

One way to prevent an LOV to be listed here, is to upgrade the LOV to the newer version. Then it will not be marked as “LEGACY_SQL” anymore.

Tip:
It is advisable to upgrade all old LOVs to the new LOVs. This should be an essential part of the upgrade strategy of your application. Do not misunderstand me. You can keep your LOVs as they were before and the application will still run. But if you want to move forward, upgrade all LOVs.

To upgrade a LOV that is already a shared component is very easy. Just press the Convert Legacy SQL button.

screenshot LOV conversion - before

And check the column mapping afterwards

screenshot LOV conversion - after

LOVs that are not shared components need to be copied into a shared component first. Future APEX versions will probably change this.

Conclusion

After the upgrade to APEX 19.2 control the correctness of your LOVs in all apps by running the /apex/utilities/check_lovs_for_errors.sql script for each app.

The script points out potential LOV issues – analyse and correct those issues.

Take also some time to upgrade old style LOVs into the shared component multicolumn LOV.

The script check_lovs_for_errors.sql

With kind permission from the APEX team I show the script here

Rem  Copyright (c) Oracle Corporation 1999 - 2019. All Rights Reserved.
Rem
Rem    NAME
Rem      check_lovs_for_errors.sql
Rem
Rem    DESCRIPTION
Rem      Checks List of Values defined both inline on an item, and at shared component level for possible execution errors.
Rem
Rem    NOTES
Rem      - This utility should be run via SQL*Plus and connected as your application parsing schema.
Rem
Rem    Arguments:
Rem     Position 1: Application ID you wish to check
Rem     Position 2: APEX user name from the workspace the application belongs to
Rem
Rem    MODIFIED    (MM/DD/YYYY)
Rem      arayner    10/09/2019 - Created

set define '&'
set concat on
set concat .
set verify off
set termout on

define APP_ID       = &1
define APEX_USER    = &2

declare 
    l_context        apex_exec.t_context;
    l_error_count    number := 0;
    l_lov_count      number := 0;
    
    function is_plsql( p_sql_or_plsql in varchar2 ) return boolean is
    begin
        return coalesce( not( upper( substr(trim(p_sql_or_plsql), 1, 6) ) = 'SELECT' or upper(substr(trim(p_sql_or_plsql), 1, 4)) = 'WITH' ), true );
    end is_plsql;
begin 
    apex_session.create_session( &APP_ID, null, '&APEX_USER' );

    for l_lov in ( select *
                      from ( select 'Inline'             lov_type,
                                    application_id       app_id,
                                    page_id              page_id,
                                    item_name            name,
                                    lov_definition       query
                               from apex_application_page_items
                              where lov_definition       is not null
                                and lov_definition       not like 'STATIC%'
                                and lov_definition       not like '.%'
                              union all
                             select 'Shared Component'   lov_type,
                                    application_id       app_id,
                                    null                 page_id,
                                    list_of_values_name  name,
                                    list_of_values_query query
                               from apex_application_lovs
                              where source_type_code     = 'LEGACY_SQL' )
                     where app_id = &APP_ID
                     order by lov_type, app_id, page_id, name
                  )
    loop
        begin 
            l_lov_count := l_lov_count + 1;
            l_context := apex_exec.open_query_context(
                p_location              => 'LOCAL',
                p_sql_query             => case when not is_plsql( l_lov.query) then l_lov.query end,
                p_plsql_function_body   => case when is_plsql( l_lov.query) then l_lov.query end,
                p_max_rows              => 0 );        -- We are not interested in the results, we simple want to see if the query executes without error
            apex_exec.close( l_context );
        exception    
            when others then 
                l_error_count := l_error_count + 1;
                apex_exec.close( l_context );
                sys.dbms_output.put_line( '--------------------' );
                sys.dbms_output.put_line( 'Error #' || l_error_count );
                sys.dbms_output.put_line( 'Application: ' || l_lov.app_id );
                sys.dbms_output.put_line( 'Type:        ' || l_lov.lov_type );
                if l_lov.page_id is not null then 
                    sys.dbms_output.put_line( 'Page:        ' || l_lov.page_id );
                end if;
                sys.dbms_output.put_line( 'Name:        ' || l_lov.name );
                sys.dbms_output.put_line( 'LOV (' || case when is_plsql( l_lov.query ) then 'PL/SQL' else 'SQL' end || '):' ); 
                sys.dbms_output.put_line( l_lov.query );
                sys.dbms_output.put_line( 'Error:       ' || SQLERRM );
                sys.dbms_output.put_line( '' );
        end;
    end loop;
    
    sys.dbms_output.put_line( '--------------------' );
    if l_error_count > 0 then
        sys.dbms_output.put_line( 'Action Required! ' || l_error_count || ' LOV definitions raised an error, please review to see if they need to be fixed to avoid facing the same error in your app at runtime.' );
    else
        sys.dbms_output.put_line( 'No action required! All ' || l_lov_count || ' LOV definitions executed successfully.' );
    end if;

exception    
    when others then 
        apex_exec.close( l_context );
        sys.dbms_output.put_line( SQLERRM );
end;
/

APEX 5.1 quick tipp: select * considerations for remote views

Many developers don’t like select *. I’m a big fan of it, but there are some edge cases where one needs to be careful. I don’t want to discuss pros and cons here in this thread. This is just to point out a few areas where useing select * gives not the advantage that one could expect.

I like to program select * in multiple scenarios. Usually to express, that I want to access (almost) every column from that table or view. I’m too lazy to write down every single column name.

A typical APEX example would be to edit a table via an Interactive Grid.

Scenario setup

Imagine a remote database with a table MYTAB. We access this remote database via a database link from a local database with APEX installed. In the SQL workshop we have a view that was originally created as

create view myTab_remote as
select * from mytab@dblinkname;

That advantage of that view is, that we create a layer where the name of the DB link is used. Using this layer we don’t need to know the DB link name inside our APEX application. Which makes it easier to switch or change the link.
Also the APEX framework is now able to use the oracle data dictionary for that view. Newer APEX versions have improved capabilities to work with remote tables. But here I’m talking about version 5.1.

Our Interactive Grid uses a fairly simple query.

select * from myTab_remote
where parent_id = :P1_MASTER_ID

Modifications

So what happens when a column is added on the remote database to our table, for example the column price_unit.

alter table myTab
add price_unit varchar2(5);

The APEX application is still working, no issue happend there. It does not automatically has the new column.

In general this is good. We have a robust appliaction that does not break, simply because a new column was added (it would break if a column is dropped however).

Certainly the column was added with some intention in mind. We also want to show and edit this new column in our Interactive Grid.

How to add this new column to our application?

First step is to update the view. One might think this is not necessary, because we created the view using select *. Unfortunatly that is not how Oracle works, especially not via a database link.
When investigating the view via the SQL tab in the SQL workshop, we find that the DDL is different than what one would think.

CREATE OR REPLACE FORCE VIEW "MYTAB_REMOTE" ("ID", "PARENT_ID", "COL_A",  "COL_B",  "PRICE") AS 
   select  "ID", "PARENT_ID", "COL_A",  "COL_B",  "PRICE"  from MYTAB@DBLINKNAME
 /

The column list was expanded into the select statement and also captured as the column list name of the view itself. The new column price_unit is missing.

To add the new column we could again simply create the view. A normal recompile is not enough. Btw. this also happens with views over local tables.

create or replace view myTab_remote as
select * from mytab@dblinkname;

Hint: never use the FORCE keyword for development work. It may hide important error messages.

After that we can select from the view and will see the new column. However it is still missing from the Interactive Grid.

The second step is to push APEX into reevaluating the column list for this view.

Simply validating the SQL query will not be enough. I found the following sequence of steps do work.
First add an alias and a new dummy column to the query.

select m.*, 'x' new_dummy_col
from myTab_remote m
where m.parent_id = :P1_MASTER_ID

Validate it and press OK. This results in two new columns added to the grid column list. Then enter the SQL query again and remove the dummy column.

select m.*
from myTab_remote m
where m.parent_id = :P1_MASTER_ID

Result is we now have the new column in our list.

The third and last step is to add this column to our default reports.

The new column is at the very end of the column list. On an IG it is shown, on an IR it is not shown by default. In any case we want to move this new column via the Actions > Columns menu to the correct position. And then save the public report Actions > Save Report. This should be done for each public report in that Grid.

Conclusion

Using select * in a APEX Interactive Grid scenario did not lower the maintenance needed when adding new columns to the base table. The second step even might be slightly confusing for many developers. So it might be a good idea to use a complete column list there instead of select *.

Site note: Using select * in other scenarios like inside PLSQL indeed does lower the maintenance when done right compared to an explicit full column list.

APEX 19.2 ea – features I like

The following is a not complete and not ordered list of tiny and major features that I found interesting in the upcoming APEX 19.2 version. Since this is an early adopter version, be aware that some of those features might not make it into the final product.

I can not guarantee that all features are exclusively for APEX 19.2 I might have overlooked one or the other in one of the previous very recent versions like 19.1 or 18.3.

Here is a link to the new features page. Not everything I mention is on that new features page.

Star item type

There is a new item type “star”. Essentially the star rating plugin has been integrated directly.

The default setting is ok, but we can customize it.

It works even better with the dark theme.

I encountered a display bug when trying to use a large font with the “fa-lg” modifier. But when trying to reproduce that again, it worked. It seems to help, if there is another star item on the same page.

Debug level default

The “Debug” level setting now has new default options. We can customize them via the toolbar.

Additionally to the old YES/NO debug switch we can also choose “App Trace” and “Full Trace”.

The setting is then attached to the toolbar “Debug” button, so that we can remember which option was chosen.

  • Info = Level4 = YES
  • APP Trace = Level6
  • Full Trace = Level9
dev toolbar
c_log_level_error constant t_log_level := 1; -- critical error 
c_log_level_warn constant t_log_level := 2; -- less critical error 
c_log_level_info constant t_log_level := 4; -- default level if debugging is enabled (for example, used by apex_application.debug) 
c_log_level_app_enter constant t_log_level := 5; -- application: messages when procedures/functions are entered 
c_log_level_app_trace constant t_log_level := 6; -- application: other messages within procedures/functions 
c_log_level_engine_enter constant t_log_level := 8; -- Application Express engine: messages when procedures/functions are entered 
c_log_level_engine_trace constant t_log_level := 9; -- Application Express engine: other messages within procedures/functions 

https://docs.oracle.com/en/database/oracle/application-express/19.1/aeapi/Constants-2.html#GUID-412ED5E2-1739-4A9B-B214-38674B4A4BCD

I think my preferred debug default will be “App Trace”.

faceted search

When I saw the first versions of this during APEX Connect 2019 it was still called “report filter region”. And I was totally hyped about that. It seems to fulfill that promise.

general considerations

There are other products like QlikView/QlikSense that offer such a kind of user experience. And once the users are used to that, they miss it in APEX applications. APEX is not yet on par with those products. Faceted searches are a big step forward for an improved user experience.

Here is a promotion video, that shows some of those enhanced filter capabilities in QlikView.

implementation in APEX

So how does the APEX version of faceted search looks like and how does it work?

  • First create a data region, like a classic report. I didn’t test other region types like Interactive Reports yet.
  • Then create a faceted search region that references the data region.
  • Then create facets that are connected to database columns from the data region.
APEX 19.2 – faceted search example

The user clicks on any of the filter options in the search (the facet region) and the report is filtered to those search options. The total counts for each options also react to the other filters and change accordingly.

In the facet search region we can create facets of different types (checkbox, radio, range, search, select list). A facet is always connected to a database column. Each facet has a large number of configuration options.

feature assessment

Here is a highly educating discussion with examples about how the GUI for faceted filters should work: https://www.uxmatters.com/mt/archives/2009/09/best-practices-for-designing-faceted-search-filters.php.

When we compare the criteria from that article to the options available in APEX we see that APEX does many things right. UX considerations like how to clear filters are supplied in a declarative way. Still the feature is not complete yet and slightly buggy (I had issues with the range type facet for example). But that is to be expected for such a complex enhancement. And we can expect more improvements in the future.

Meanwhile on twitter:

So one trick for range facets to use a special syntax on LOVs. It works!

This is the best and most useful 19.2 feature!

enhanced LOV

I like icons. The new features page mentions that we can now put icons to LOV entries. Unfortunately this works only for multi-column popup LOVs. Not for normal static lists.

An LOV can now be used to populate multiple items. This is a really nice enhancement (and long overdue).

Currently many options seem not to be balanced properly. For example a on a modal page layout – depending on some other settings – the shared component LOV uses the return value and does not show the display value.

Remember it is still an early adopter version.

improved LOV configuration

It is now possible to convert a locally defined LOV (one that is defined on a page) into a shared LOV.

Static LOV entries now have conditions, a sequence number and we can comment the LOV.

New design for the switch item

There are three different component settings possible, that influence how a switch item will look like.

APEX 19.2 display style = Switch

display style = Pill Button

display style = Select List

More options are better!

Unfortunately the new Switch style does not show the label value that is currently choosen. Nevertheless it looks very useful especially for interactive grid columns.

Excel Upload for Data load wizard

I couldn’t test this yet, but it sounds highly useful.

Markdown textareas

Markdown is a very common shorthand syntax to format text. Mostly used on GitHub, but also many wikis use a similar syntax. Useful for developers, but also for end users. If the rich text editor offers too many options, the markdown editor is very nice to concentrate on basic styling.

APEX 19.2 markdown editor vs. richtext editor

For more information check out the many helpful articles about markdown on GitHub:

https://help.github.com/en/articles/basic-writing-and-formatting-syntax

github markdown cheatsheet

Other tiny changes

  • The Hamburger Menu that collapses the left sidebar – removes the sidebar completely. Icons included. This is configurable (Collapse Mode in User Interface).
  • The page loading indicator is smaller and spins faster
  • The icon library can be “Font APEX” or “Font APEX – latest”
  • There is a compatibility mode 19.2
  • More options for the logo line: Like “IMAGE and TEXT”

“greener” APEX apps

This started as a fun discussion in an syntegris internal chat group. But it got me thinking:

Is there a way to make APEX applications more energy efficient?

I came up with a set of ideas and options that have the potential to save energy. Not all options are useful and not all options have a measureable effect. Some are very controversial. The ideas presented here are far from complete.

I added my thoughts to a kialo discussion. Feel free to enter your own arguments there. This is my first kialo discussion – I want to try it out. So please be kind. 😉

I will try to add any interesting considerations that are in the kialo discussion also to this post.

From a very high level view point, we have three areas where we can influence the amount of energy that is used: server – network – client.

server side considerations

Using less CPU means using less energy. APEX applications should avoid wasting CPU.

serve APEX files from the Oracle CDN

A content delivery network provides common files from a server that is geographically close to the client. This also means that the company webserver will not provide the file but the CDN server will. It is possible to configure APEX to get its static files (like jquery, core apex css, etc.) from the CDN.

https://blogs.oracle.com/apex/announcing-oracle-apex-static-resources-on-oracle-content-delivery-network

PRO: The company web/app server will need less energy when the static files are delivered by the CDN.

CON: For local clients the time to get the files from the CDN will be longer. Which also means that energy is wasted somewhere. Probably on the network. Maybe on the firewall.

PRO: Ressources (images, css, js files) that are identical for multiple applications even from different host urls, will be cached only once on the clients browser if they are served from the same CDN.

ORDS should run on the same machine as the database.

PRO: One less server is one less server.

CON: Servers nowadays are mostly virtualized containers running on the same hardware.

ORDS standalone is better than ORDS on Tomcat

A similar consideration could be made for Tomcat vs. Glashfish or Tomcat vs. WebFly (formerly known as JBoss)

PRO: ORDS standalone runs with the Jetty Webserver. Jetty is considered to be very lightweight. Which means it uses less RAM and probably less CPU.

So far I couldn’t test this theory, but there should be a way to measure the impact of ORDS on the different application servers.
Here is a very analytical paper that studies the implications of running java based application on Jetty.
https://www.google.com/url?sa=t&rct=j&q=&esrc=s&source=web&cd=1&cad=rja&uact=8&ved=2ahUKEwjPn5mqgYXjAhUD5aYKHddkDOAQFjAAegQIARAC&url=https%3A%2F%2Fhal.inria.fr%2Fhal-00652992v2%2Fdocument&usg=AOvVaw2TAsQuz5MBwOcE7K8Mccav

Using more disk space does not correlate to energy consumption the same way as CPU does. Discs are cheap and they don’t need more energy to store more data.

CON: More data that needs to be transfered and backuped will inevitably need more energy.

PRO: Powered down disks keep the data regardless of how much they store. 4 GB or 5 GB is not a difference to them.

CON: Even a powered down hard drive will still use a little energy. https://superuser.com/questions/565653/how-much-power-does-a-hard-drive-use

Avoid pagination schemes that include Z (x of y from z)

PRO: A pagination scheme with Z means the query is rewritten to include the analytical row_number() over () function. This also means, that more data needs to be read from disk into memory, just to know how many potential rows there are.

CON: For smaller tables a multi-block-read count will load the whole table into memory. Counting or numbering the rows will then have no noticable impact on energy consumption.

client side considerations

In general a tablet uses less energy than a laptop which uses less energy than a desktop PC. So should APEX applications be build for tablets first and foremost?

CON: It does not make sense to exclude users that prefere a certain screen size.

CON: We should make the whole screen available to the end user. More information on a single page will mean less need to navigate to other pages. Which potentially saves energy.

PRO: APEX applications should be carefully tested and optimized for usage on a tablet. If they work really well on a smaller screen, then users will not feel forced to switch to another device when using the app.

APEX 19 has a dark mode. Developers should use dark mode and dark themes to save energy.

The idea is that a monitor uses less energy to show “blackness” than to show “whiteness”.

PRO: That seems to be true. See this fairly recent recommendation by google: https://www.xda-developers.com/google-wants-developers-to-add-dark-themes-to-save-battery-life/

  • Brightness affects power usage, and battery life, in a mostly linear fashion.
  • A dark theme can reduce battery usage, even with max brightness, by up to 63% on AMOLED displays.
  • Pixel color value can also affect power usage quite a bit, with white being the most power-hungry color.

Classic Reports use less energy than Interactive Reports (or Interactive Grids)

PRO: A classic report will be created on the webserver and send as static html to the browser. An interactive report will add a lot of javascript functionality to the data. Which means all those JS files need to be loaded and some are executed during page load.

CON: Interactive Grids have this lazy loading pagination scheme. Data will only be fetched when the end user requests to see more data by scrolling down.

PRO: With APEX 18.2 we also get the option to create a column toggle report. This is slightly more flexible than a classic report without all the interactions made available by an IR.

network traffic

The computers that run the network are there anyway. However we can speculate that by sending less information over the internet, there would be less powerhungry computers that are the internet nodes.

Decrease image size. Provide smaller images depending on screen resolution.

PRO: Smaller images allow faster loading times which positivly effects network traffic and also client rending times. This is especially noticable on low bandwith machines like mobile phones.

CON: There is a huge starting effort to create and provide images for all sizes. It is highly doubtful that this original energy spent will ever be overtaken by the energy savings from smaller network traffic.

How do web applications build with APEX compare to other web applications?

APEX applications have a tendency to consume data in a very efficient way.

The overhead for communication with the database is less then for other types of web applications, like PHP.

CON: Not all applications are data centric.

PRO: There is no additional network between the application layer and the database layer.

CON: With APEX 18 and even more so with APEX 19, reports can be built on top of a web service. The web service provider would be the same no matter what kind of framework was used to build the application. In many cases a pure javascript framework (like Oracle JET) might be more efficient to consume those REST based web services, than an APEX application.

PRO: Because the APEX repository already resides in the database all the optimizions for database logic are used while preparing a page for rendering.

Result?

What started out as a “Schnapsidee” quickly got me thinking. There are actually quite a few ways to influence the energy consumption of an APEX application. And this is true during developement but also for running the application.

APEX Instrumentation and the SQL Developer

In general I do instrument all my code, but usually I have plsql code that calls some framework like logger. Because of that I rarely add extra APEX instrumentation code. Any trace or debug information is already written into the logger table.

Sometimes it makes sense to add calls to apex_debug too. Especially if this part of the logic is checked frequently using the APEX built-in debug functionality.

APEX 19.1 developer toolbar

Debugging in APEX has a huge advantage. As a developer it is very easy to do and to access the output.

The apex_debug package is available at least since APEX 5. Among others it includes a procedure enter to store parameters. It is recommended to call this at the beginning of your modules and add the combination of parameter name and value to the procedure.

Recently I added apex_debug.enter to several of my modules. Here are a few tricks I’d like to share.

Tipp 1: Debug level 5

Apex_debug has several levels. The default level is 4 (info).

If you want to see the information stored with apex_debug.enter, you need to show at least level 5.

The level can be set in the url. Instead of YES, set it to LEVEL5.

f?p=App:Page:Session:Request:Debug:ClearCache:itemNames:itemValues:PrinterFriendly

In APEX I use the enter procedure to store page item values that are used inside plsql blocks but also to see what is going on at the database level. Here is an example

before header plsql process

The process first calls apex_debug.enter. Then the procedure pk_setze_defaults.prepare_topbar calls apex_debug.enter a second time and stores the supplied parameter values.

And this is how the view debug output can look like

Show debug

Useful to see the state of page items at time of processing. And even more interesting is to see what procedures where called and which parameters had been used.

Tipp 2: avoid hardcoding the module name

The first parameter of the enter procedure is p_routine_name.

Instead of hardcoding the name we can call utl_call_stack to return the name of the module. You need to have at least database version 12c to use it.

utl_call_stack.concatenate_subprogram( 
    utl_call_stack.subprogram(1))

Utl_call_stack.subprogram gives us access to the module names inside the call stack. Number 1 in the stack is always the current module. Subprogram returns a collection which holds the package name and the submodule name. Sometimes multiple submodule names. The concatenate_subprogram function translates this collection into a readable string (divided by dots).

Example: Instead of hardcoding the module name ‘post_authenticate’

apex_debug.enter(p_routine_name=>'post_authenticate'
                ,p_name01 =>'p_user', p_value01 => p_user);


I use utl_call_stack to have the database fetch the module name at runtime

apex_debug.enter(p_routine_name=>utl_call_stack.concatenate_subprogram(utl_call_stack.subprogram(1))
                ,p_name01 =>'p_user', p_value01 => p_user);

The result:

PK_APEX_UTIL.post_authenticate p_user=>Sven

The first part is the module name (incuding package name), the second part is a list of parameter=>value combinations.

There are some side effects to it. The name is fetched at runtime, instead of decided at compile time.1 In some cirumstances (module inlining) a procedure can be rewritten by the plsql optimizer, so that the name of the module disappears. Utl_call_Stack would then return the name of the module, where the code was inlined into.

The runtime call is also slightly slower than the literal value.

Inside a plsql process in APEX the name will be __anonymous_block . Which is correct. APEX executes those blocks using dbms_sql. The name of the process is not known inside the block. But it can be seen in the APEX debug view output one line before the anonymous block.

So the advantage of not hardcoding the module name must be weighted against the possible side effects.

If you want the procedure name, but not the package name, then the following code will help. It returns only the name of the current (innermost) submodule:

utl_call_stack.subprogram(1)(utl_call_stack.lexical_depth(1)+1)

Tipp 3: use the newest SQL Developer version (18.4)

SQL Developer 18.4 has the built-in ability to grey out instrumentation code. I like this feature a lot. It allows the trained developers eye to quickly scan plsql code – without resting too much on the less important bits and pieces.

What surprised me is that this also includes apex_debug.

Here is an example screenshot. Notice how the whole call to apex_debug is greyed out.

SQL Developer 18.4 – PL/SQL code colors

Other packages that are greyed out are dbms_output, log and logger.

And we can add our own instrumentation framework to it. Which leads me to tipp 4.

Tipp 4: configure SQL Developer – add your instrumentation framework

It is a bit hard to find, but the color rule PlSqlCustom2 is where we can add our own package. Search for color in the preferences to find the entry. In one of my projects the instrumentation package is called pk_logging. So I add it like the screenshot shows.


Tools / Preferences => Code Editor / PL/SQL Syntax colors

And this is how the sample result looks like.

SQL Developer 18.4 – PL/SQL code colors – enhanced

Tipp 5: use snippets

Snippets are a nice little feature in SQL Developer. And you can add your own useful code snippets to it. I added a snippet for apex_debug.enter

SQL Developer – snippets view

Once implemented I simply double click the snippet and it adds the following code block.

    apex_debug.enter(p_routine_name => utl_call_stack.concatenate_subprogram(utl_call_stack.subprogram(1))
                    ,p_name01=>'XXX',p_value01=>xxx
                    ,p_name02=>'YYY',p_value02=>yyy
                    ,p_name03=>'ZZZ',p_value03=>zzz
                    );

If you like you can download this snippet from the SQL Developer exchange plattform (https://apex.oracle.com/pls/apex/f?p=43135:16:0::NO:RP,16:P16_ID:1141)

But it is easier just to create your own snippet and copy the code from here.

Conclusion

Make use of the developer tools you have. Use apex_debug, use SQLDeveloper. Think about your instrumentation framework. Make it as easy to use as possible.

Further readings

Footnotes

1. In APEX compile time and runtime of a PLSQL process are almost identical. The PLSQL process is dynamically compiled at runtime.
RDS as tabs

APEX quickie: set region display selector dynamically

A region display selector (RDS) can be configured so that it remembers the last selected region or tab. However sometimes we might want to navigate from another page directly to a specific tab no matter what the last remembered session state was. 

Here is how to do that.

My example uses a region display selector set to “View single region” and three color coded regions. The template options are choosen in such a way, that the regions are displayed directly below the selector, with no additional margin.

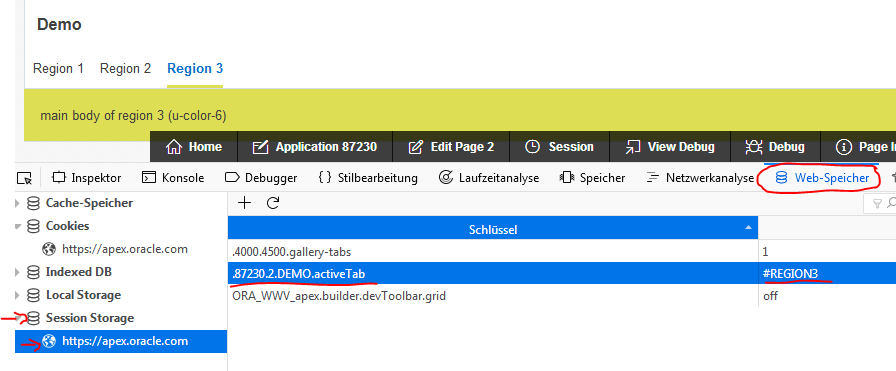
The region display selector (RDS) uses the session storage of the browser to remember the active tab. This can be investigated using the browsers developer tools.
Find web-storage, navigate to the Session Storage and look at the keys.

The Key here is using a prefix that consists of three parts. The application id (in my case 87230) the page number (2) and the region static id (DEMO). The name of the key is “activeTab”.  So the full name of the key is .87230.2.DEMO.activeTab

We can read and set the local storage and the session storage using APEX javascript apis. Link to the docs

The following code can read the session storage for the current page and will set a key to a specific value.

let sesStorage = apex.storage.getScopedSessionStorage({
       useAppId:true, 
       usePageId:true});
sesStorage.setItem( "DEMO.activeTab", "#REGION3" );

Typically we want to set the target tab from inside a different page. Set the target display selector, then navigate to that target page. This is the more logical thing to do, otherwise we could simply click on the link or sent this click event to the appropriate item. 

// choose target region via region display selector
// static id = "REGION3"
$('#REGION3_tab a').trigger('click');
If we are currently on a different page, we need to construct the prefix for the key by ourself. That is why the following code sets usePageId to false. It would be possible to read the session state for the whole application, but I prefere to read only the needed parts. So we construct the key prefix by ourself and this includes the appId.

let sesStorage = apex.storage.getScopedSessionStorage({
       prefix:"."+&APP_ID.+".2", 
       useAppId:false, 
       usePageId:false});
sesStorage.setItem( "DEMO.activeTab", "#REGION3" );
I tested this useing a static select list with a dynamic action that essentially run this code. And the result is as expected. The 3rd region is selected. Also the developer tools show that the value was changed. rds_result Fairly easy, once we know what to do. In the future I might use this session storage for other things too.

add JET 5.1/5.2 to APEX via CDN

How to use the newest Oracle JET version in APEX?

While writing this blog post the most recent version of Oracle JET is version 5.1.0. 5.2.0.

5.1 was an interesting version, since charts have been improved to accept an data provider attribute (http://www.oracle.com/webfolder/technetwork/jet/jetCookbook.html?component=chart&demo=dataProvider)

So let’s assume we want to use this version.

Some time ago I published how to integrate JET [2.2.0] into Apex 5.0. It needed quite some setup to do. Some steps probably could have been done in a more elegant way. Additionally see John Snyders recommendations Using Oracle JET from APEX which do eliminate some of the issues that I encountered. For example there is really no need to throw out hammer.js from the theme.

Meanwhile Oracle has made JET available via the Oracle Content Delivery Network (CDN). And this makes it possible to load the necessary JET libraries from this CDN instead of installing it locally to our webserver. Awesome stuff!

I tested this solution with Apex 5.1.1 (on premise) and with Apex 18.1 (on apex.oracle.com).

Which source files are needed?

We need three types of sources.

  • require to load and install additional libraries
  • the Oracle Jet stylesheets
  • various Oracle Jet javascript libraries

Some comments about those files.

Require.js already comes installed in your local Apex installation. It might be a different version, but still is an option to be considered. I only tested using require in the version that matches with Oracle Jet.

Oracle jet now has a file bundled-config.js which adds all of the jet libraries. This might be a bit too much, but it provides a quick and easy way to install JET. In case we only want to use a special visualization, this provides access to way more libraries than needed. I didn’t test if performance improves if I install only the necessary libraries for a special visualization. I hope that because of require, the performance difference would be minimal. Require only loads a file, when it is really needed. Inspecting the network traffic seems to support that notice.

Once those sources are installed to our page, we can copy any example from the Jet Cookbook and use it in our application. Be aware some cookbook examples use additional resources, like JSON data files. You need to copy and reference those too.

New page template

The three source files need to be added to the page. I suggest to create a new page template so that the logic can be reused for multiple pages.

Make a copy of the standard page template. I named it something like “Standard + Jet 5.1”. Then add a few lines to enable Oracle Jet 5.1.0 on this new template.

The two javascript files need to be added to the javascript file section.

https://static.oracle.com/cdn/jet/v5.1.0/3rdparty/require/require.js
https://static.oracle.com/cdn/jet/v5.1.0/default/js/bundles-config.js

page_template_javascript

As an alternative to the bundles-config.js file, we can install the whole set of the require config in the function declaration section:

//-----------------------------JET STUFF -----------------------------
// alternative source locations
//#APP_IMAGES#oraclejet/main.js
//#IMAGE_PREFIX#libraries/oraclejet/js
requirejs.config({
  // Path mappings for the logical module names
  paths: {
    'knockout': 'https://static.oracle.com/cdn/jet/v5.1.0/3rdparty/knockout/knockout-3.4.2',
    'jquery': 'https://static.oracle.com/cdn/jet/v5.1.0/3rdparty/jquery/jquery-3.1.1.min',
    'jqueryui-amd': 'https://static.oracle.com/cdn/jet/v5.1.0/3rdparty/jquery/jqueryui-amd-1.12.0.min',
    'ojs': 'https://static.oracle.com/cdn/jet/v5.1.0/default/js/min',
    'ojL10n': 'https://static.oracle.com/cdn/jet/v5.1.0/default/js/ojL10n',
    'ojtranslations': 'https://static.oracle.com/cdn/jet/v5.1.0/default/js/resources',
    'text': 'https://static.oracle.com/cdn/jet/v5.1.0/3rdparty/require/text',
    'promise': 'https://static.oracle.com/cdn/jet/v5.1.0/3rdparty/es6-promise/es6-promise.min',
    'hammerjs': 'https://static.oracle.com/cdn/jet/v5.1.0/3rdparty/hammer/hammer-2.0.8.min',
    'signals': 'https://static.oracle.com/cdn/jet/v5.1.0/3rdparty/js-signals/signals.min',
    'ojdnd': 'https://static.oracle.com/cdn/jet/v5.1.0/3rdparty/dnd-polyfill/dnd-polyfill-1.0.0.min',
    'css': 'https://static.oracle.com/cdn/jet/v5.1.0/3rdparty/require-css/css.min',
    'customElements': 'https://static.oracle.com/cdn/jet/v5.1.0/3rdparty/webcomponents/custom-elements.min',
    'proj4js': 'https://static.oracle.com/cdn/jet/v5.1.0/3rdparty/proj4js/dist/proj4'
  },
  // Shim configurations for modules that do not expose AMD
  shim: {
    'jquery': {
      exports: ['jQuery', '$']
    }
  }

});

If you want to use this option and Jet 5.2 then I suggest to look into the 5.2.0 bundles-config.js file, and copy the correct paths out of it.

page_template_function_declaration

Remember above code is not needed! It comes preconfigured in the bundle-config.js file. I offer it only as an alternative installation that gives a little more control over the libraries.

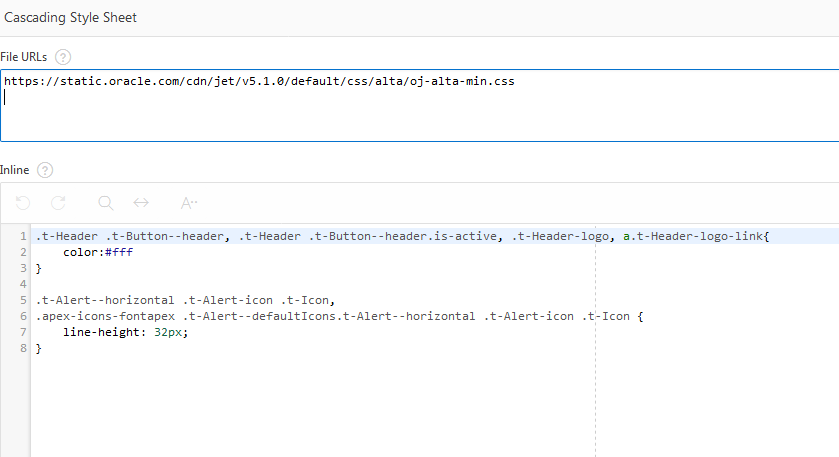
Finally we need to add some css. Add the link for the JET style to the CSS file section.

https://static.oracle.com/cdn/jet/v5.1.0/default/css/alta/oj-alta-min.css

And additionally you might want to add a little inline css. See the issues section for an explanation.
page_template_css

And finally use this new page template for your page.

Example result

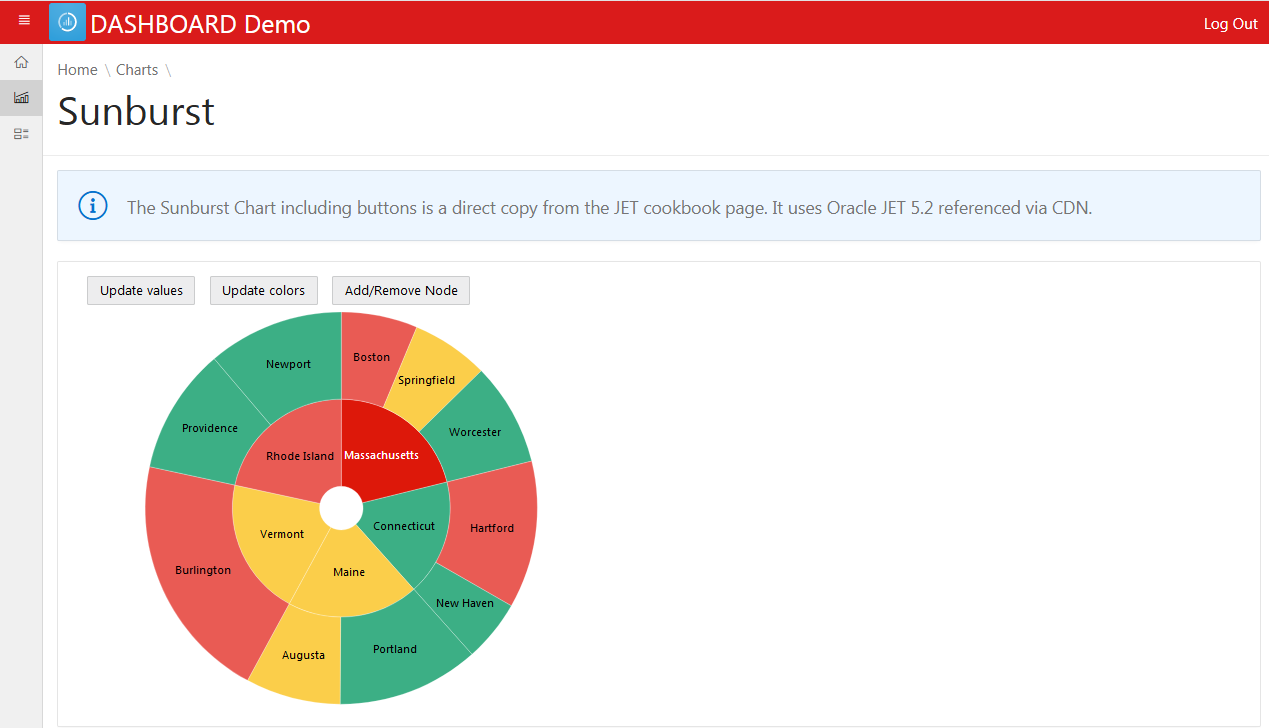
And this is how using Oracle Jet 5.1/5.2 in Apex can look like.
JET_Dashboard_Sunburst
The source code for that chart can be found at the end of the post. Or go to the Jet Cookbook and try it our there. Did you notice, you can spin the whole wheel around?

Issues

There are some minor problems that I encountered. Especially some css issues because JET overwrites several of the Apex Theme css settings. Which is not good. I made a sample demo to show the issues. I only tested it with the red theme style, but I think the issues persist in all styles.
Theme Bug Demo

I do have css based workarounds for the issues I found so far. The solution is also demonstrated in the demo app. Here is the css code that can be added to the page or the template (css section).

.t-Header .t-Button--header, .t-Header .t-Button--header.is-active, .t-Header-logo, a.t-Header-logo-link{
    color:#fff
}

.t-Alert--horizontal .t-Alert-icon .t-Icon,
.apex-icons-fontapex .t-Alert--defaultIcons.t-Alert--horizontal .t-Alert-icon .t-Icon {
    width: 48px;
    height: 48px;
    line-height: 48px;
}

I think those issue are really bugs. And the Apex team and the Jet team can both be held responsible. The APEX side should have used a better css specificity for the header styles, the JET side should not set styles for things like a:visited for the whole html page.

And I believe there are more side effects. That is also the main reason why I would add JET only to specific pages. And why I would avoid mixing normal apex charts with newer version JET charts. Don’t mistake me, I made a few simple tests and it worked. I could create a region with a normal apex jet chart (apex 5.1) and combine it with a region using a CDN loaded JET chart (Legend + PictoChart). I just didn’t test it thoroughly enough to recommend it.

What is a CDN and is it safe?

https://en.wikipedia.org/wiki/Content_delivery_network

A content delivery network provides ressources, like in the JET case, javascript and css files, in a way that optimizes access times. So if a user accesses our application from Europe, the ressources will be delivered from a European server. If the user sits in America, an American server is choosen to deliver the files. This also frees up some bandwidth for our own webserver. After the first load, the browser usually caches the files.

If different applications all use the same remote ressource via CDN, the browser can reuse the cached files. This is especially interesting for the very common libraries, like JQuery.

But performance is not the only argument. With Oracle JET I find it way more convinient to load the newest JET version directly from Oracle instead of going through the hassle and install it to the local webserver. Often this involves using deployments scripts and documenting what exactly to do, so that in an enterprise environment, the same steps can be later made for the production server.

But is it safe to use? The most secure method is, if you download the js files from a trusted source (Oracle CDN). Then inspect each file, if there is any malicious code in it. Once you are sure it is safe, you install the files onto your own webserver and serve the ressources from there.

One of the most basic security features is to use HTTPS and not HTTP, especially when accessing remote ressources. This lowers the chance for man in the middle attacks essentially.

Especially the DNS lookup to the CDN server might be a performance drain. But in terms of web speed there are many things to consider.
Pros

  • Ease of installation
  • Performance boost for global user base
  • Browsers limit parallel loads from the same source. Loading additional ressources from a second source circumvents that issue.
  • Bandwidth moved from own webserver to CDN

Cons

  • Less control over the logic that is loaded – you need to trust the CDN provider
  • CDN provider could be down
  • For local users CDN will be slower than serving from local webserver

quick conclusion

Oracle JET via Oracle CDN is a good concept especially during a developement and testing phase. For on premise production usage you might want to consider to install Oracle JET to your local webserver and run it from there.

more

Here are a few links that I found interesting and that cover several other topics about using or not using a CDN.

updates and addendum

Oracle JET 5.2.0

Very recently Oracle JET 5.2.0 was released. I test it only very briefly. You just have to change the version number in the source file path.

Here is the official release schedule for the future Jet versions.

Sunburst Example

The following code is a direct copy from the Oracle Jet Cookbook.

Create a static region and add this as the region source.
Unfortunatly I encounter some issues when posting oj-tags here. The code is missing in the final view. Best way is to go directly to the source and copy the code from there. Everything inside the body tag is needed.

<div id="sampleDemo" class="demo-padding demo-container">
  <div id="componentDemoContent" style="width:1px;min-width:100%;">

    <div id='sunburst-container'>
        <div style="padding-left:16px;float:left;">
          Update values
        </div>
        <div style="padding-left:16px;float:left;">
          Update colors
        </div>
        <div style="padding-left:16px;float:left;">
          Add/Remove Node
        </div>
        <br style="clear:left;" />


    </div>


  </div>
</div>

Or copy the code from this screenshot
JET_Sunburst_html_source

Add this on the page level to the “function and global variable declaration”:


require(['ojs/ojcore', 'knockout', 'jquery', 'ojs/ojknockout',
    'ojs/ojbutton', 'ojs/ojsunburst'],
function(oj, ko, $)
{
    function SunburstModel() {
        var self = this;

        var colorHandler = new oj.ColorAttributeGroupHandler();

        var MA = createNode("Massachusetts", "0", getValue(), getColor());
        var CT = createNode("Connecticut", "1", getValue(), getColor());
        var ME = createNode("Maine", "2", getValue(), getColor());
        var VT = createNode("Vermont", "3", getValue(), getColor());
        var RI = createNode("Rhode Island", "4", getValue(), getColor());

        addChildNodes(MA, [
          createNode("Boston", "00", getValue(), getColor()),
          createNode("Springfield", "01", getValue(), getColor()),
          createNode("Worcester", "02", getValue(), getColor())
        ]);
        addChildNodes(CT, [
          createNode("Hartford", "10", getValue(), getColor()),
          createNode("New Haven", "11", getValue(), getColor())
        ]);
        addChildNodes(ME, [
          createNode("Portland", "20", getValue(), getColor()),
          createNode("Augusta", "21", getValue(), getColor())
        ]);
        addChildNodes(VT, [
          createNode("Burlington", "30", getValue(), getColor())
        ]);
        addChildNodes(RI, [
          createNode("Providence", "40", getValue(), getColor()),
          createNode("Newport", "41", getValue(), getColor())
        ]);
        var nodes = [MA, CT, ME, VT, RI];
        function createNode(label, id, value, color) {
          return {label: label,
                id: id,
                value: value,
                color: color,
                shortDesc: "<b>" + label +
                  "</b>
Value: " + value};
        }

        function addChildNodes(parent, childNodes) {
          parent.nodes = [];
          for (var i = 0; i &lt; childNodes.length; i++) {
            parent.nodes.push(childNodes[i]);
          }
        }

        function getValue() {
            return Math.round(50 + 100 * Math.random());
        }

        function getColor() {
            return colorHandler.getValue(Math.floor(Math.random() * 4));
        }

        self.nodeValues = ko.observableArray(nodes);

        self.valueButtonClick = function(event) {
            for (var i = 0; i &lt; nodes.length; i++) {
                if (Math.random() &lt; 0.4)
                    nodes[i].value = getValue();
                for (var j=0; j &lt; nodes[i].nodes.length; j++) {
                    if (Math.random() &lt; 0.4)
                        nodes[i].nodes[j].value = getValue();
                }
            }
            self.nodeValues(nodes);
            return true;
        }

        self.colorButtonClick = function(event) {
            for (var i = 0; i &lt; nodes.length; i++) {
                if (Math.random() &lt; 0.3)
                    nodes[i].color = getColor();
                for (var j=0; j &lt; nodes[i].nodes.length; j++) {
                    if (Math.random() &lt; 0.3)
                        nodes[i].nodes[j].color = getColor();
                }
            }
            self.nodeValues(nodes);
            return true;
        }

        self.nodeButtonClick = function(event) {
            if (nodes.length &lt;= 5) {
                var newNode = {
                  id: &quot;5&quot;, value: getValue(),
                  color: getColor(), label: &quot;New York&quot;,
                  nodes: [
                     {id: &quot;50&quot;, value: getValue(),
                        color: getColor(), label: &quot;New York City&quot;},
                     {id: &quot;51&quot;, value: getValue(),
                        color: getColor(), label: &quot;Albany&quot;}
                  ]
                };
                nodes.push(newNode);
            }
            else {
                nodes.pop();
            }
            self.nodeValues(nodes);
            return true;
        }
    }

    var sunburstModel = new SunburstModel();

    $(
        function()
        {
            ko.applyBindings(sunburstModel,
                    document.getElementById(&#039;sunburst-container&#039;));
	}
    );
});